Show summary Hide summary
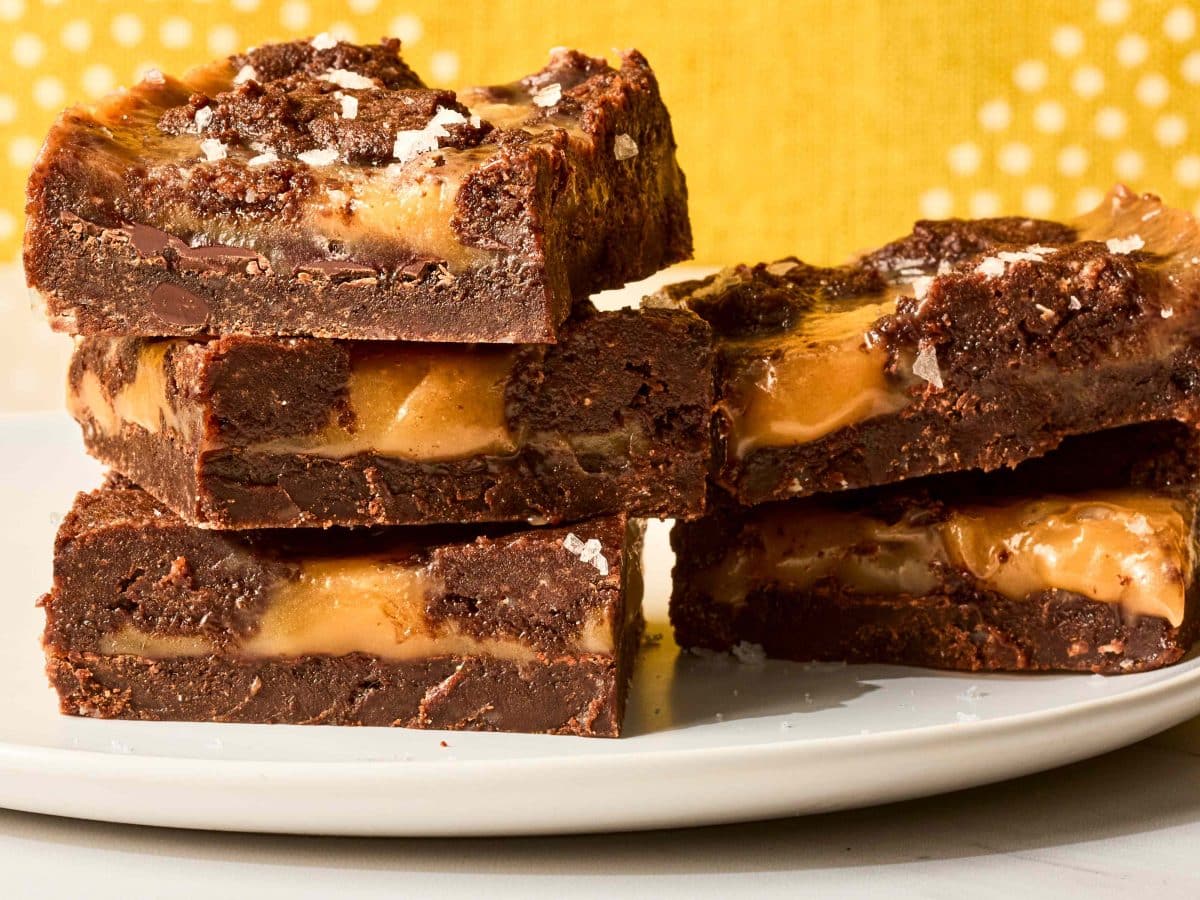
This summer’s crowd-pleaser: a layered dessert bar that balances a dense cocoa crust with a silky, homemade caramel and scattered chopped chocolate. It slices cleanly for picnics and potlucks while staying satisfyingly gooey in the center — a simple dessert that feels elevated without demanding professional technique.
The structure is straightforward: a chewy, cocoa-forward base, a blanket of warm caramel, and a final scatter of chopped chocolate that melts into pockets when warm. That combination delivers contrast — crisp edges, a tender crumb, and molten ribbons of caramel — which makes each square worth returning for.
Why this matters now
Philadelphia restaurants to try now: 38 top picks across the city
Summer tomatoes: simple pantry hack extends freshness and juiciness
As gatherings and outdoor entertaining ramp up, baked goods that are easy to portion and transport are more useful than ever. These bars travel well, store simply, and satisfy varied tastes without a lot of last-minute fuss. They also fit current home-baking trends favoring approachable techniques and bold, familiar flavors.
For home cooks who want control over texture and sweetness, homemade caramel is the crucial upgrade: it lets you dial back sugar, add a touch of salt, or boost creaminess. But if time is tight, good-quality store-bought caramel can be a workable shortcut.
Key techniques and variations
To keep the bars sliceable and tidy, two moments matter most: chilling before slicing and using a hot, dry knife when you cut. The base should be fully cooled so the caramel sets properly; chilling for at least an hour improves clean edges.
- Chilling: Refrigerate the pan for 60–90 minutes before slicing for neat pieces.
- Cutting: Warm a chef’s knife under hot water, dry it, then slice in one steady motion.
- Caramel options: Use homemade for flavor control; use jarred for speed.
- Flavor boosts: Sprinkle flaky sea salt, add chopped nuts, or fold orange zest into the caramel.
Small adjustments change the final mouthfeel: more butter in the base yields a softer bar; a longer bake time firms the crust and reduces chew. Chopped chocolate on top creates molten pockets; alternatively, chunks folded into the caramel deliver an even distribution of chocolate in every bite.
Timing at a glance
| Step | Approximate time |
|---|---|
| Prepare and press cocoa base | 10–15 minutes |
| Bake base | 12–15 minutes |
| Make caramel and pour | 10–20 minutes |
| Chill before cutting | 60–90 minutes |
Storage is forgiving: kept airtight in the refrigerator, these bars last up to five days; freeze them between layers of parchment for longer keeping. Rewarm briefly in a low oven if you want the chocolate melty again before serving.
Whether you’re baking for a backyard crowd or assembling treats for a week of snacks, these bars offer a reliable balance of texture and flavor without requiring specialist skills — just a few thoughtful steps and modest ingredients. The result is a versatile, portable dessert that handles summer gatherings and casual dinners equally well.
Caffeine in chain restaurant fruit drinks could affect kids: key info for parents
Coffee creamer ideas: 11 ice cream flavors to elevate your morning cup